How To Tie A Bandana Into A Bow - Simple Style Guide
Bandanas, those humble pieces of fabric, have been around for ages, serving many different purposes, from keeping sweat away during hard work to adding a splash of color to an outfit. They are, in a way, a timeless accessory, offering a simple method to express your personal flair or just add a bit of something extra to your everyday appearance. Whether you are looking to spruce up a casual look or add a whimsical touch to something a little more put together, knowing how to shape one of these versatile squares into a charming decorative loop can make a real difference.
- Talking To Someone With Blue Eyes Meme
- Petey Fat Camp
- Softsoap 3d Fish
- Maury Memes You Are Not The Father
- Myke Towers Novia
This little piece of cloth, often with a fun pattern, holds a surprising amount of styling potential. You might have seen them worn around the neck, as a head covering, or even tied to a bag. What many people might not realize is just how straightforward it can be to turn one of these everyday items into a delightful little bow, giving your look a playful and appealing finish. It's actually a pretty simple skill to pick up, and it opens up a whole lot of creative possibilities for your personal style.
So, if you have a bandana lying around and you're curious about how to give it a fresh purpose, or if you are simply searching for a quick and easy way to add a bit of charm to your ensemble, you've come to the right spot. We are going to walk you through the steps to create a lovely fabric bow using just one of these square pieces of cloth. It's a quick fashion trick that can really make your outfits pop, and it’s something you can do in just a few moments, really.
Table of Contents
- What is a Bandana, Really?
- Why Consider Learning How to Tie a Bandana into a Bow?
- Getting Ready - What You'll Need to Tie a Bandana into a Bow
- The Core Steps - How to Tie a Bandana into a Bow
- Are There Different Ways to Tie a Bandana into a Bow?
- Making Your Bandana Bow Look Just Right
- Beyond the Basics - Where Can You Wear a Bandana Bow?
- Caring for Your Bandana After You Tie a Bandana into a Bow
- How Long Is Okra Water Good For In The Fridge
- King Von Coffin
- Que Jamon Es Bueno
- Trakk Ear Wax Removal App
- Wife In Stocking
What is a Bandana, Really?
A bandana, at its heart, is a square piece of cloth, quite often made from cotton, though you can find them in silk or other soft textiles. Historically, people used them for practical reasons, like shielding their heads from the sun or soaking up perspiration during hard labor. Over time, these simple fabric squares began to take on a more decorative role, becoming a popular item in fashion for people of all walks of life. They come in so many different colors and patterns, from classic paisley to polka dots, or even more abstract designs, offering a lot of ways to show off your own unique taste, you know.
The beauty of a bandana lies in its plain shape and its ability to be folded, rolled, or bunched up in countless ways. This plainness is what makes it such a flexible accessory. You can use it as a head covering, a neck scarf, a wrist adornment, or even as a little flourish for your handbag. The size of a typical bandana is usually around 22 by 22 inches, which is just about right for most of these styling approaches. It's really quite amazing how much you can do with just a simple square of cloth, actually.
When you consider the different types of fabrics, like the smooth feel of silk or the soft comfort of cotton, each one brings a distinct quality to how the bandana hangs and holds its shape. A silk bandana, for instance, might offer a more flowing, refined look, while a cotton one could give off a more relaxed, casual vibe. The material you pick can definitely influence the final appearance of your decorative knot, making it either more structured or a bit softer in its overall form, too it's almost.
Why Consider Learning How to Tie a Bandana into a Bow?
You might wonder why someone would want to learn how to create a decorative loop from a bandana. Well, for starters, it's a wonderfully simple way to add a touch of personality to your appearance without needing to buy anything new. If you already have a bandana, you have all the materials you need. It’s a bit like finding a new use for something you already own, which is pretty satisfying, in a way. This method lets you refresh your existing wardrobe items with just a quick adjustment.
Also, a bandana shaped into a decorative knot offers a playful and charming visual element. It can soften an outfit, add a dash of color, or just provide a sweet, feminine touch. Think about how a small detail can sometimes make a big difference in how an entire look feels. This little fabric ornament can really pull things together or give a simple shirt and jeans combo a bit more flair. It’s a very versatile little trick, really, that can be used in many situations.
Beyond just looking nice, learning this skill means you have another trick up your sleeve for quick style adjustments. Whether you are getting ready for a casual get-together, a day out with friends, or just want to feel a little more put together while running errands, a bandana transformed into a decorative knot is a swift and easy solution. It doesn't take much time, and the outcome is always a bit delightful, you know. It’s a fun, no-sew project that lets you show off your creative side.
Getting Ready - What You'll Need to Tie a Bandana into a Bow
Before you start making your decorative fabric loop, you only really need one main item: a bandana. Any square bandana will do, though a standard size, like one that is about 22 inches by 22 inches, tends to be the easiest to work with for this particular shape. If your bandana is very large, you might find you have a lot of extra fabric, and if it's very small, the decorative knot might end up being quite tiny. So, a typical square one is usually the best bet for a balanced appearance, obviously.
The material of your bandana can affect how the finished decorative knot looks. Cotton bandanas are generally easy to handle because they hold their shape well and are not too slippery. Silk ones, on the other hand, might give you a softer, more flowing decorative knot, but they can be a little more challenging to keep in place since silk tends to be quite smooth. So, if you're just starting out, a cotton one is probably a good choice. You can always try silk later once you get the hang of it, basically.
You do not need any special tools, like scissors or a sewing machine, to create this pretty fabric shape. This is a truly no-sew project, which makes it super simple and quick to do. All you need are your hands and a flat surface to work on, though you can even do it in the air if you feel comfortable. It’s a pretty straightforward process that anyone can try, without needing to gather a lot of supplies, you know.
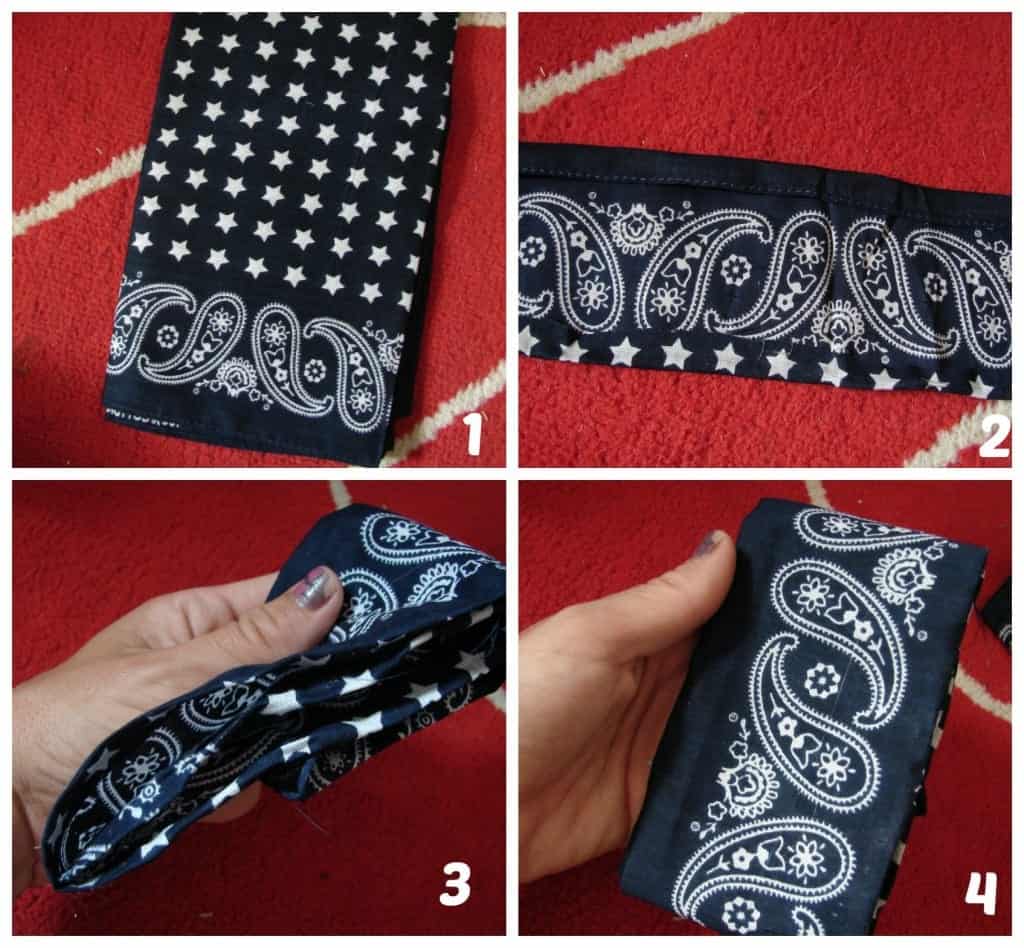
The Core Steps - How to Tie a Bandana into a Bow
Let's get to the heart of the matter and walk through the simple steps to create a charming decorative loop from your bandana. This method is pretty simple and can be adapted for various uses. The most important thing is to start with your bandana laid out flat, making sure it’s smooth and free of any major wrinkles. This helps in getting a neat and tidy final shape, you see.
Begin with a Triangle Shape: Take your square bandana and fold it in half along the diagonal. This means you bring one corner across to meet the opposite corner, creating a large triangle. Smooth out the fold so it lies flat. This is the basic starting point for many bandana styles, actually.
Roll or Fold the Long Edge: Once you have your triangle, take the longest edge (the one opposite the point) and begin to roll it or fold it down towards the point. You want to create a long, somewhat narrow strip of fabric. The width of this strip will determine how wide your finished decorative knot will be. You can make it as wide or as narrow as you like, depending on the look you're going for, in a way.
Pinch the Center: Now that you have a long strip, find the very middle of it. Gently pinch the fabric at this central spot. As you pinch, you'll see the sides of the strip start to gather and puff out a little, beginning to form the shape of a decorative knot. This is where the magic really starts to happen, you know.
Wrap and Secure the Ends: While still holding the pinched center, take the two ends of the fabric strip that are sticking out. Bring these ends around the back of the pinched center and then tie them together in a simple knot. This knot will hold the gathered fabric in place and keep the decorative loop shape secure. Make sure the knot is snug enough to hold the shape but not so tight that it distorts the decorative loop, sort of.
Adjust and Fluff: Once the knot is tied, gently pull and adjust the loops of your decorative knot until they look even and full. You can fluff them out a little to give them more volume or smooth them down for a flatter appearance. This is where you fine-tune the look to your liking. And that’s pretty much it for creating your basic decorative knot, really.
Are There Different Ways to Tie a Bandana into a Bow?
While the method we just went over is a pretty common and straightforward way to make a decorative knot, there are indeed some small variations you can try to get a slightly different appearance. The basic idea of folding, pinching, and tying remains the same, but you can play with the initial fold or how you secure the ends to change the final look a little. It's kind of like how you might tie a regular shoelace knot slightly differently, you know.
For instance, instead of rolling the bandana into a strip, you could fold it more precisely, creating flatter, crisper edges for your decorative knot. This might give you a more structured and less fluffy outcome. Some people prefer this cleaner line, especially if they are going for a more refined or polished appearance. It just depends on the kind of vibe you're hoping to create with your accessory, you see.
Another approach involves how you secure the decorative knot itself. Instead of a simple knot at the back, some folks might use a small, clear elastic band to hold the center, especially if they are making a hair accessory. Then, they might wrap the ends around the elastic and tuck them in, or even tie them into a second, smaller knot for extra security. This can be helpful if you want the decorative knot to stay put in a very active setting, like during a dance or a busy day out, you know. It gives it a little more grip, basically.
You can also experiment with the size of the decorative knot by adjusting how much fabric you pinch in the middle. A larger pinch will result in a smaller decorative knot with longer ends, while a smaller pinch will give you a bigger, fuller decorative knot with shorter ends. It's all about playing around with the fabric until you find a look that you really like and that suits your style. There's no single "right" way, just what works best for you, really.
Making Your Bandana Bow Look Just Right
Once you have the basic decorative knot shape, the next part is all about making it look polished and just how you want it. This is where a little bit of fiddling and adjusting comes into play. You want to make sure the loops are even and the ends are hanging nicely, or tucked away if that’s your preference. It’s like putting the finishing touches on a painting, you know, making sure every detail is in its proper place.
Take a moment to look at the two loops of your decorative knot. Are they roughly the same size? If one looks bigger than the other, gently pull on the fabric of the larger loop and push some of it into the central knot, or pull on the smaller loop to even things out. A little bit of gentle tugging and smoothing can make a big difference in the overall balance of the decorative knot. It should look symmetrical, or at least pleasingly balanced, basically.
Then, consider the ends that you tied to secure the decorative knot. You can let them hang loose, which can add a bit of playful movement to your look. Or, if you prefer a cleaner appearance, you can carefully tuck these ends underneath the main loops of the decorative knot or wrap them around the central knot so they are hidden from view. This gives a very neat and tidy finish, especially if the decorative knot is going to be a prominent part of your outfit, you see.
Finally, give the loops a little fluff. If they look a bit flat, gently pull them apart a bit to introduce some air and volume. This makes the decorative knot look fuller and more appealing. The goal is to make it look intentional and well-formed, rather than just a haphazard knot. A few small adjustments can really bring the whole thing to life, really, and make it look like you put a lot of thought into it.
Beyond the Basics - Where Can You Wear a Bandana Bow?
Now that you know how to create this charming fabric ornament, the fun part is figuring out all the different places you can wear it. A bandana shaped into a decorative knot is incredibly versatile and can add a special touch to so many parts of your outfit or even your accessories. It’s like a little splash of cheer you can place almost anywhere, you know.
One of the most popular spots for a bandana shaped into a decorative knot is in your hair. You can attach it to a ponytail or a bun, giving a simple hairstyle an instant lift. It can also be worn as part of a headband, with the decorative knot sitting at the top or side of your head. For a truly playful look, you might even consider weaving the ends of the bandana into a braid, letting the decorative knot sit at the base or along the length of your hair. This is a very sweet and feminine way to use it, actually.
Beyond hair, consider wearing the decorative knot around your neck. It’s a softer, more casual alternative to a traditional necktie or scarf. You can wear it with a button-down shirt, letting the decorative knot sit just at the collar, or with a simple t-shirt to add a little something extra. This gives a sort of relaxed yet put-together feel to your upper body. It’s a subtle way to add a bit of charm, you know, without being too loud.
Your accessories can also get a style upgrade with a bandana shaped into a decorative knot. Think about tying one to the handle of your handbag or backpack. It’s a quick and easy way to personalize your bag and give it a fresh look without having to buy a whole new one. You could also tie a smaller decorative knot around your wrist, like a fabric bracelet, or even loop it around the strap of a hat. These small touches can really make your overall appearance feel more thought out and unique, really.
For a truly creative approach, you can even use a bandana shaped into a decorative knot to accent your clothing directly. Imagine a small decorative knot pinned to the lapel of a jacket, or used as a decorative element on a plain belt. It’s a way to add a pop of color or pattern to an otherwise simple garment. The possibilities are pretty wide open, depending on how you want to express your personal flair, you see. It’s a very adaptable little item.
Caring for Your Bandana After You Tie a Bandana into a Bow
Once you've enjoyed wearing your bandana shaped into a decorative knot, you will want to make sure it stays looking nice for future uses. Taking proper care of your bandana means it will hold its color and shape, ready for you to create another lovely decorative knot whenever you wish. It’s a bit like caring for any other piece of your wardrobe, really, just with a few simple considerations.
Most cotton bandanas are quite easy to look after. You can usually wash them in a machine with similar colors, using cool or warm water. It’s a good idea to let them air dry or tumble dry on a low setting to help prevent them from shrinking or fading too quickly. If your bandana has a particularly bright or deep color, washing it separately the first few times might be a good idea to avoid any color transfer to other items. This helps keep all your clothes looking good, you know.
If your bandana is made of silk, it will need a bit more gentle handling. Silk fabrics are often best hand-washed in cool water with a mild soap, or you might even consider dry cleaning for the best results. Hanging silk to dry away from direct sunlight helps keep its smoothness and shine. Ironing silk on a low setting while it's still slightly damp can also help to smooth out any wrinkles and keep it looking its best. It’s a little extra effort, but it’s worth it for the feel of the fabric, you see.
After washing, if your bandana is a bit wrinkled, a quick iron can make it perfectly smooth again, which is very helpful when you want to create a crisp, well-formed decorative knot. A smooth bandana is always easier to fold and shape neatly. Storing your bandanas flat or loosely folded can also help prevent deep creases, so they are ready to go whenever inspiration strikes to make another beautiful decorative knot, basically. It just makes things easier for next time, too it's almost.
- Quien Ganar%C3%A3 El Super Bowl 2022
- Kash Doll Hair Layers
- Fenix Flexin Mike Sherm
- Beyonce Dua Lipa
- Sitting On Balloons
bandana bow tie (all hot glue!) - A girl and a glue gun

DIY Bandana Bow Tie For Dogs | Earth Rated

DIY Bandana Bow Tie For Dogs | Earth Rated
